For many rose enthusiasts, successfully growing a rose from a cutting to a fully rooted, garden-ready plant is a rewarding process. Jason, from Fraser Valley Rose Farm, has outlined the step-by-step journey that takes a cutting from its initial stage to a thriving 2-gallon plant ready for planting or sale. This article provides a detailed guide to those stages, with practical tips for each step, offering insights for both beginners and experienced gardeners.
Understanding the Timeline
The journey from cutting to garden-ready rose typically takes between 9 to 12 months, depending on the climate and growing conditions. Jason highlights that this timeline is based on his northern temperate climate with mild winters, but gardeners in other regions—especially those with tropical or harsh winter climates—should adjust their timelines accordingly.
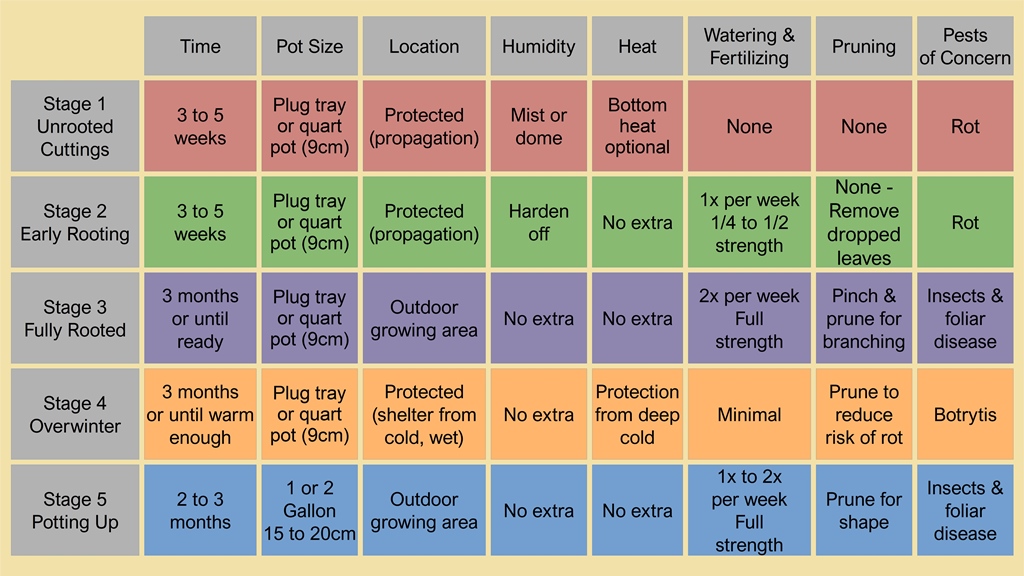
This guide breaks the process into distinct stages:
- Taking Cuttings
- Early Rooting Stage
- Fully Rooted Stage
- Overwintering
- Transplanting
Each stage comes with its own growing conditions, challenges, and care requirements.

Stage 1: Taking Cuttings
When to Start:
- In Jason’s climate, cuttings are typically taken in June or July, during the growing season when roses are actively producing semi-hardwood stems.
How to Select Cuttings:
- Look for stems that are firm but still pliable, with fresh growth.
- A good cutting is about 3–4 inches long, with at least three nodes.
Preparation and Propagation:
- Remove excess leaves to reduce water loss and dip the cuttings into rooting hormone to encourage root development.
- Plant the cuttings in small pots or plug trays filled with a sterile propagation mix.
- Place the pots in a controlled environment, such as a greenhouse, under a humidity dome, or indoors with bottom heat and artificial light.
Key Challenges:
- The cuttings must remain moist but not waterlogged to avoid drying out or rotting. Mist them regularly (e.g., every 15 minutes for 7–8 seconds in a misting system) to maintain humidity.
Stage 2: Early Rooting
Timeline:
- After 3–5 weeks, the cuttings will begin to form calluses and roots.
Signs of Progress:
- Gentle tugging on the cuttings should reveal resistance, indicating root development.
- By this stage, cuttings may begin to sprout new leaves.
Care Tips:
- Transition the cuttings from high humidity to less-controlled conditions. They no longer require constant misting or bottom heat.
- Water about once a week, as the small pots will still retain moisture.
- Begin fertilizing lightly at a quarter to half strength to support early growth.
Common Issues:
- Overwatering can lead to rot, so water judiciously.
- Protect young roots from full sun, wind, and pests during this delicate phase.
Stage 3: Fully Rooted
Timeline:
- After another 3–5 weeks, the plants should be fully rooted, with roots reaching the sides and bottom of the pot.
Care Requirements:
- Move the plants to a more exposed growing area, such as a greenhouse floor or outdoor garden.
- Check watering needs twice a week, increasing frequency as the plants grow larger.
- Switch to full-strength fertilizer to encourage vigorous growth and branching.
Encouraging Shape:
- Begin pruning for form and balance. Remove weak, low-hanging growth to shape the plant into a well-rounded structure.
Pest and Disease Management:
- Watch for pests like aphids, spider mites, and thrips.
- As the plants grow, foliar diseases like blackspot or powdery mildew may emerge, especially if watering is inconsistent.
Stage 4: Overwintering
For regions with colder winters, overwintering is a crucial step before transplanting.
How to Prepare Plants:
- Remove dead or diseased leaves and stems to improve air circulation and prevent fungal issues like botrytis (grey mold).
- Store plants in a sheltered, unheated space such as a garage or shed to protect them from extreme cold and wind.
Care Tips:
- Water sparingly—enough to prevent the soil from drying completely, but not so much that it stays soggy.
- Avoid high humidity, which can encourage rot.
Duration:
- Overwintering typically lasts 3 months, from late fall to early spring.
Stage 5: Transplanting
By early spring, the plants are ready for their final stage of growth before being planted out or sold.
When to Transplant:
- Transplant when the plant is fully hardened off and has begun to grow actively again after winter dormancy.
Transplanting to Larger Pots:
- Move the plant from its small pot into a 1- or 2-gallon container with fresh potting soil. Ensure the new container allows ample room for root expansion.
Care After Transplanting:
- Water once or twice a week initially, adjusting based on the plant’s growth and environmental conditions.
- Fertilize with full-strength fertilizer to support lush growth.
- Continue pruning lightly to encourage a balanced shape.
Readiness:
- In 2–3 months, the plant will have filled out its larger pot with roots and be ready for planting in the garden or sale.
Key Takeaways
Growing roses from cuttings to garden-ready plants is a rewarding but lengthy process, requiring attention to detail at every stage. Key considerations include:
- Timing: Adjust your propagation schedule to your climate and seasons.
- Environmental Control: Ensure proper humidity, temperature, and light conditions for each stage.
- Observation: Monitor for signs of overwatering, pests, or disease, and adapt care as needed.
Jason emphasizes that while the process takes time—often up to a year—it’s an immensely satisfying way to propagate roses and other shrubs. Whether you’re growing a single rose or hundreds, these steps provide a clear roadmap to success.


