Tag: own root

Grow Roses From Cuttings

Grow Roses From Cuttings

Many garden-worthy varieties of roses are in danger of disappearing. I could give a long rant about the reasons why – but it really is as simple as this: for various reasons, even wonderful roses can fall out of fashion. Sales fall below a certain level and the big nurseries can’t make money propagating them in large numbers, so they fall “out of the trade”.

Here’s where the little guys like you and me come in, and here’s what I want you to do:

  1. Collect out-of-patent and garden-worthy roses before they disappear from the nurseries
  2. Take cuttings
  3. Once rooted, sell them or give them away
  4. Accept my thanks for keeping old & uncommon roses alive and for sharing the hobby!

Of the actions listed above, numbers 1 and 4 are pretty easy… I suspect if you have any questions, it’ll be about the “taking cuttings” and the “rooting” part. Happily, there’s plenty of information out there about how to take semi-hardwood cuttings of roses (my preferred method). My part is to encourage you to get some experience doing it, and to answer any questions you may have.

Here’s an introductory video I made on the topic:

Some people learn from watching, but I really need to emphasize that the best way to learn propagation is by throwing caution to the wind and just doing it. Get those clippers into your hands and get snipping – even if you’re not sure you’re doing it right. You’ll get a feel for it as you get experience handling the roses and cuttings.

To recap and detail the points on the video:

  • Start with clean, sharp clippers. I use a Felco, but any decent quality blades will do as long as you keep them sharp and clean.
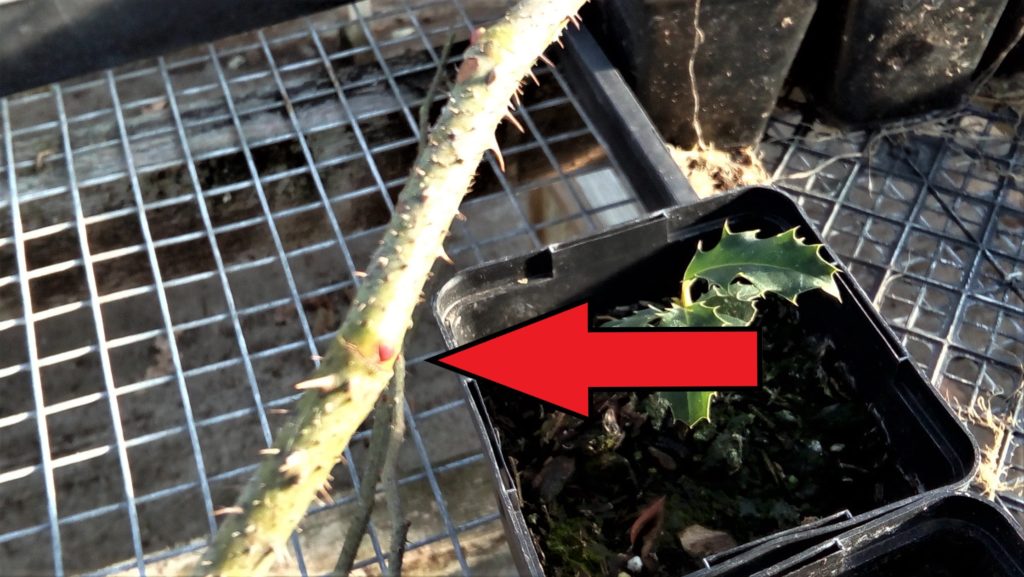
  • Select a section of the rose’s stem – a good section has at least 3 or 4 nodes and is somewhere around 4 to 6 inches in length, the thickness of a pencil or slightly thinner. What’s a node? It’s a place where a leaf emerges from the stem. If the section doesn’t have leaves at every node, you can recognize the node by the bud – see this picture as an example:
  • It may take some practice to choose the right “firmness” or ripeness of the wood. See in the video for the way I try to bend the stem – if it bends very easily, it’s too soft. If it wont bend without feeling like it will snap, it’s too hard. If you’re not sure, just take and stick the cutting anyhow. Your success rate will tell you if you got it right.
  • Cut just below the bottom node, and just above the top node. Strip off most of the leaves. In my cuttings, I leave two leaflets on the top node and that’s all.
  • To help with your success, you can dip in a rooting hormone.
  • Stick the cutting in a sterile, well-drained potting mix. No fertilizer please. You only have to push it in by an inch or two – just enough to keep it stable and upright under the mist.
  • Yes, there are alternatives to mist. I’ve had decent success with a humidity dome or tent in the past. It depends on how many you’re doing. Let me know if you need any tips! It’s important not to keep the cuttings water-logged while they’re trying to root.
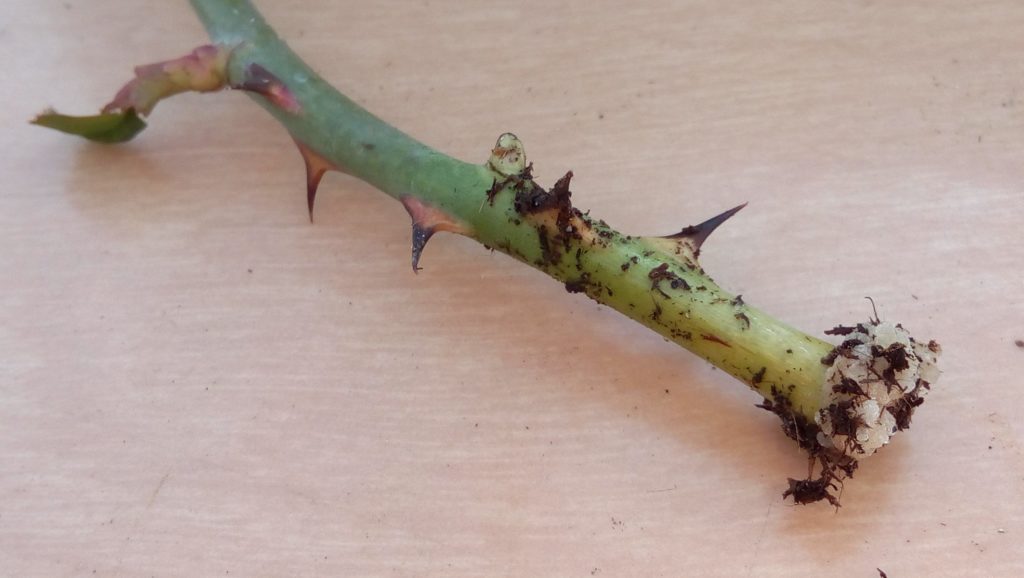
  • You’ll know your cutting is beginning to “take” if it’s forming white callus along the base of the cutting. Here’s an example:
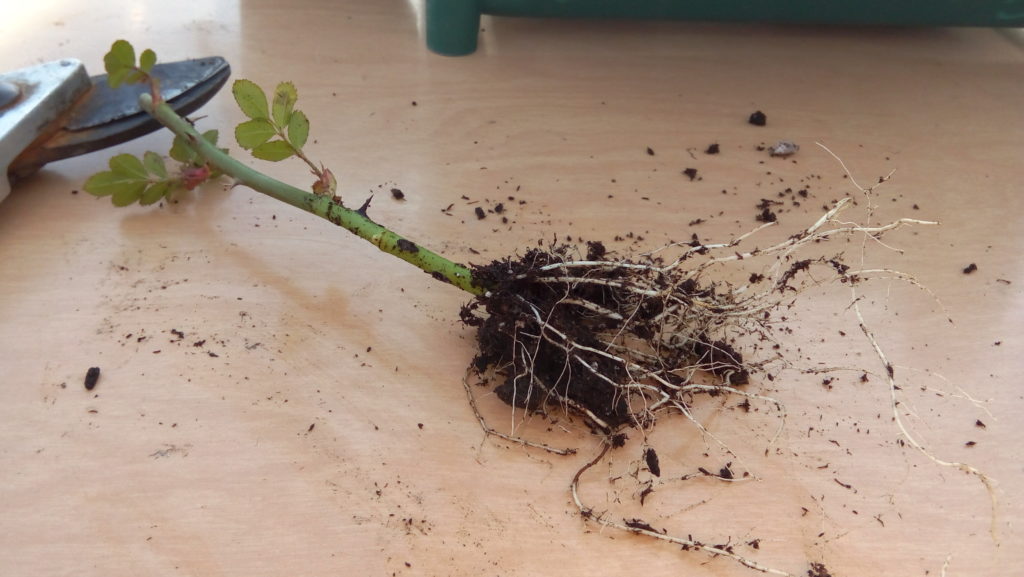
  • Reduce the mist / humidity when the cutting “pulls back” when you gently tug upward on it. At this point, the early callus tissue have begun to form roots, as pictured here:
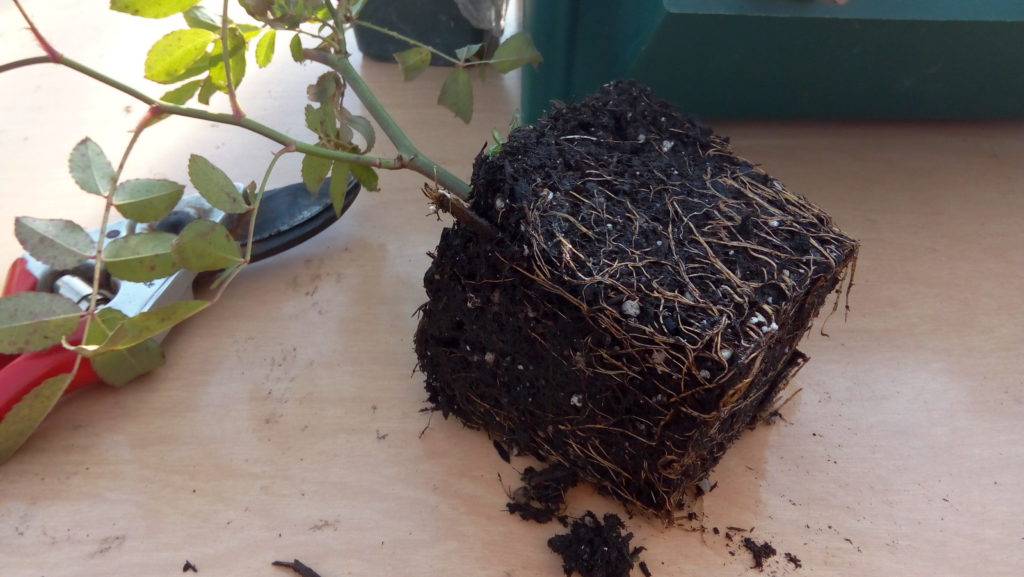
  • If you grow in the 9cm size pots I use, you can leave the cuttings to fully root and grow for 6 months, a year, or more before you have to do anything with it. Here’s an example of one I overwintered from last year:
  • And that’s it… you have a well-established rose, ready to go into a larger pot or to be sold, traded or given away.

In the time since I first wrote this article, I’ve made several other videos on plant propagation. Maybe the most common viewer request was to show a version with humidity domes rather than timed mist. The cutting technique remains unchanged, but to see an example of the success of humidity trays, have a look at this video where I propagate lavender from semi-hardwood cuttings as well:

Own Root or Grafted Roses

Own Root or Grafted Roses

It’s mad science, I tell ya… take the head of a cat, and put it on a greyhound. Good running companion, and already litter-trained! It sounds outrageous with animals, but it’s standard practice for most roses. Some species roses (Rosa multiflora and Rosa fortuniana) and some hybrids (‘Dr. Huey’) are notably vigorous, adaptable, winter hardy, or disease resistant. Grafting is usually done when rose growers want those qualities bestowed upon a slower or weaker or less hardy variety. This is accomplished by taking a bud from the scion (the rose you want to grow above ground) and implanting it under the bark of the rootstock variety. When it sprouts, we chop off the head of the rootstock, and presto: two plants conjoined, one growing above the belt and one below.

For just a bit of background on the rootstocks themselves and their advantages, here’s a video on the topic:

Last year my employer began selling tomatoes produced almost this same way, but there are no buds involved. It’s a fun process. Two tomato seedlings are grown to about the same size – small, under 3 inches tall at the time. Snip, snip. Throw away the roots you don’t want and the ‘head’ you don’t want. Hold the stem of the rootstock to the ‘head’ of the scion with a little rubbery clip, and within days the graftling heals up the graft union, and continues (very) vigorous growth.

I was surprised by the variety of reactions from customers to the tomatoes. Most thought it was pretty cool. Some were even aware that most greenhouse vegetables in BC are already grown on grafted plants. But a small minority reacted in horror. A comparison to Frankenstein’s monster even came up in one of those conversations. And if you were going to choose a famous literary monster to sum up the situation, Dr. Frankenstein’s creation is probably the most apt analogy. But get a grip!

This isn’t like the genetically modified organisms (GMO) debate, which is the other topic which often provokes the Frankenstein comparison, and which, I think, is a much more legitimate cause for concern. In grafting, we’re dealing with genetically unmodified plants, and the practice is so ancient and commonplace that any health or environmental concerns can be effectively ruled out. Try this: find a commercial apple grower who uses ungrafted trees!

(On an aside, although GMOs in agriculture are commonly dubbed “Frankenfoods”, I think  Dr. F’s monster better fits the comparison to grafting. The movie monster that best fits the whole GMO thing might be “The Fly”. Just sayin’…)

Back to roses though, there’s been a bit of an upswing in recent years of “own root” roses, and they are mostly what I sell. If you search up “own root roses” on the internet, you’ll get a lot of opinions, some of which are very negative about grafting.

Here’s an earlier video where I put together an more complete comparison of why you might choose own-root vs. grafted roses (or vice versa):

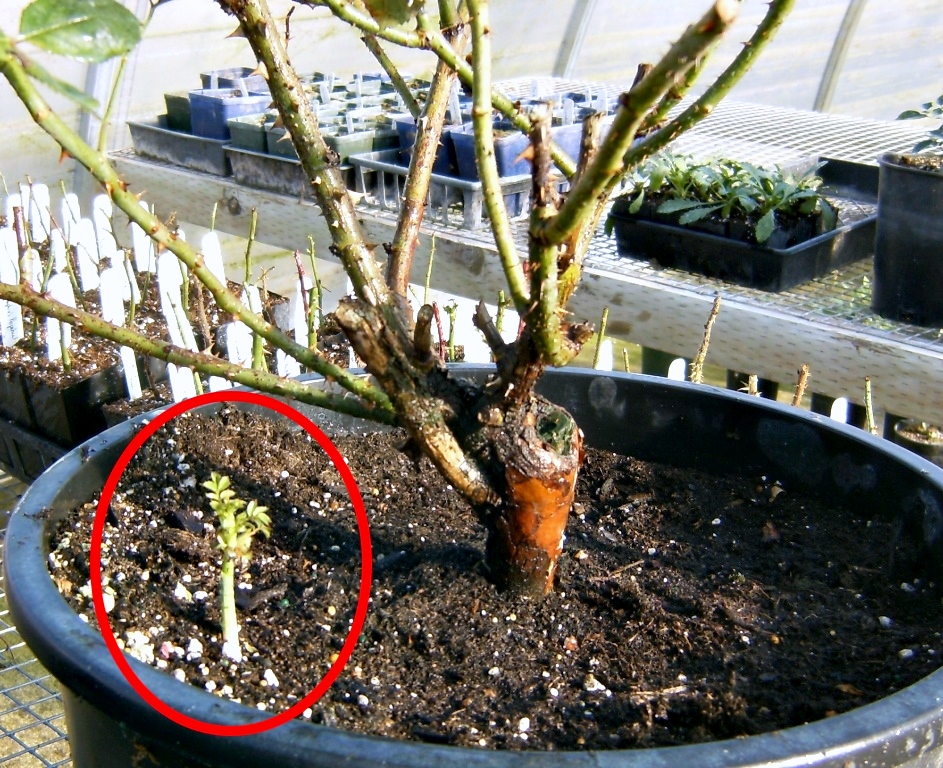
What you see in this picture is a relatively young (say 4 year old) grafted rose. The variety is ‘Falstaff’. The shoot that I circled in red is a sucker. It comes from the rootstock variety. If you’re not paying attention, and especially if the sucker arises closer to the base of the plant, the sucker may get pretty large before you figure out something’s wrong. It’s annoying, and I got stung by it one time early on into growing roses. I’d mulched the bases of my plants, and didn’t notice that a couple of suckers had emerged at the base of ‘Complicata’. By the time I figured it, the more vigorous rootstock shoots had dominated the growth of the shrub. Cutting them back down left me with a sad little plant. Oh well. Lesson learned.

So, getting past the annoyance of suckers, I’d like you to notice one other thing about the above photo. The big knobby growth at the base of ‘Falstaff’ is a the graft union. This is a young plant. When you see the graft union on an older rose, it’s usually much larger. The “scar tissue” around this graft union bulges and cracks, providing a good place for the plant to break or become diseased. Ultimately, it limits the useful lifespan of the rose.

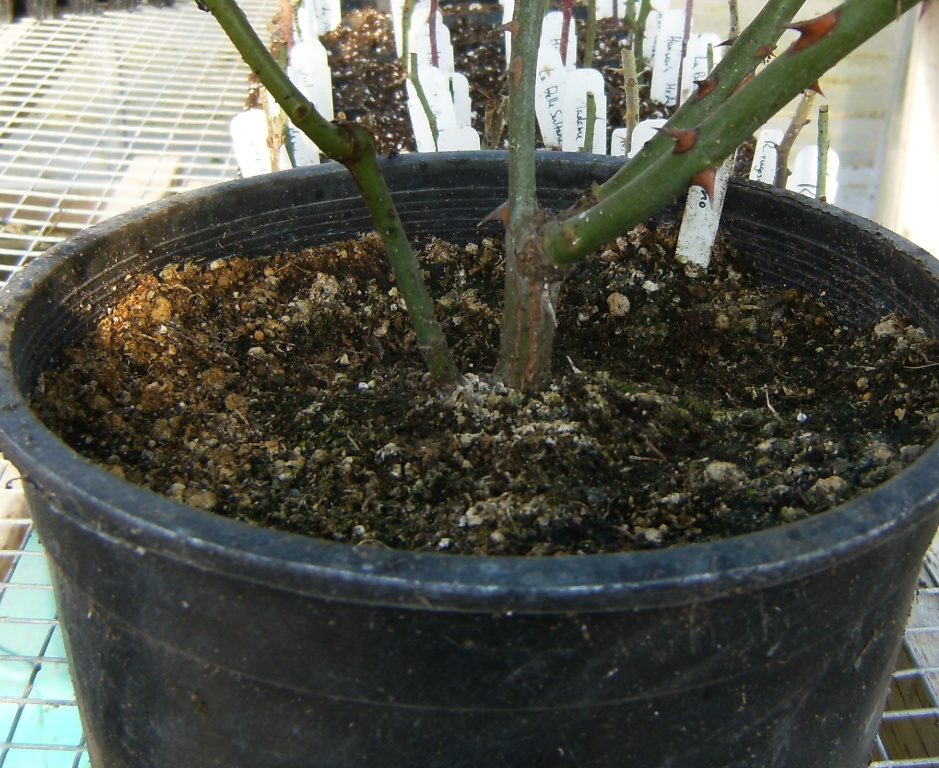
Here’s an ungrafted rose stem:

Stem of own-root rose

New basal growth can emerge near or below the soil line to renew the shrub, and there’s no pesky rootstock variety to take over. There’s also no graft union to weaken the plant over time. This variety is ‘Altissimo’, and I’ve never had any problems with vigor on its own roots.

One more picture:

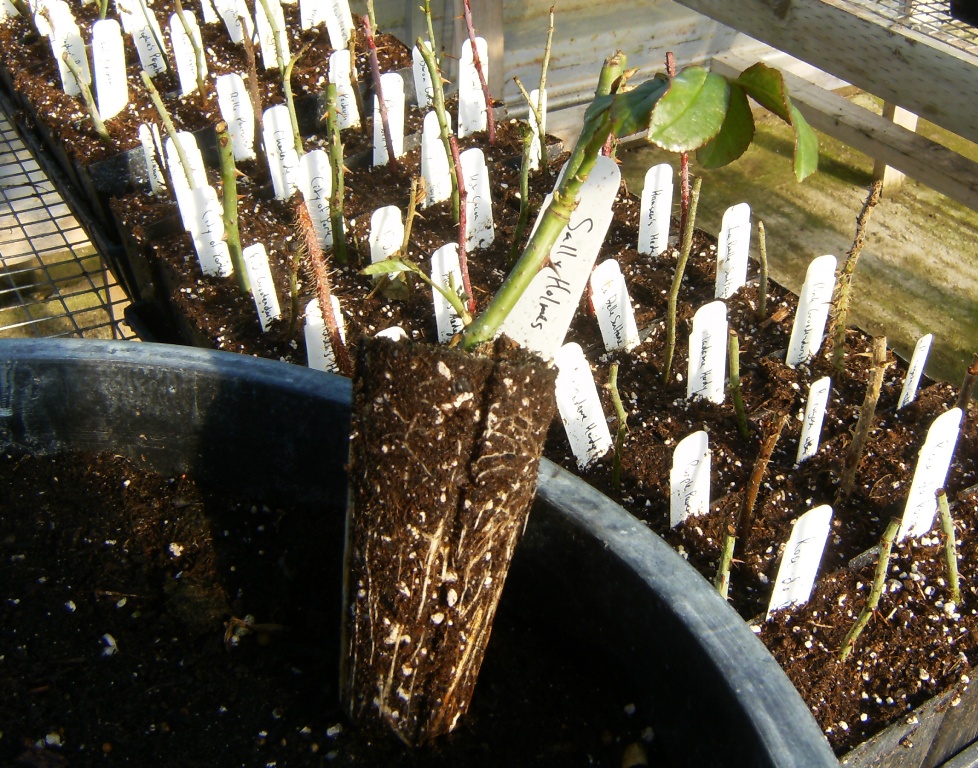
Rooted cutting

What you see here is a rooted cutting of ‘Sally Holmes’. Since I’m not doing much grafting, I thought you might like to see what I’m doing instead. When you come to think of it, though, rooting from cuttings is a bit of mad science too! Cut off a section of stem, stick it in the right conditions, and it grows new roots and shoots. In the background you can see some other cuttings getting started more or less the same way, except that they’re more or less dormant now (hardwood cuttings). The one that’s rooted already was taken earlier in the season as a semi-ripe cutting.

You might take it from what I’ve written that I have a preference for own-root roses. Not so. I simply have more practice producing roses this way, and the results for many roses are quite good. There are the advantages I’ve noted above, but the disadvantage is this: for some roses, you will probably never be happy with what you get on its own roots. My example is ‘Anisley Dickson’. Maybe someone has had success growing this one on its own roots, but for me, the rooted cuttings began sulking and they’re still doing so. Meantime, I tried grafting earlier this year, and have a massive new shoot of ‘Anisley Dickson’ emerging from the roots of Rosa mulitflora.

This jives with the experience of some of the more experienced rosarians I’ve quizzed on the matter. Some roses will perform fine on the vigor of their own roots right away, and some will take a little time, but some will never grow as nicely as you want on their own weakling roots. So for those, I’ll be experimenting with grafting.