Jason from Fraser Valley Rose Farm shares his expertise on starting seeds indoors, a vital step for gardeners looking to get a head start on the growing season. Whether you’re a novice or experienced gardener, understanding the distinct stages of seedling growth—germination, early development, and hardening off—can dramatically improve your success. By tailoring environmental conditions to these stages, you can raise strong, healthy plants ready to thrive outdoors.
Starting seeds indoors typically begins six to eight weeks before your area’s last frost date. Planning your schedule around this timeframe is crucial, as starting too early can lead to overcrowded or overgrown seedlings in their trays. Let’s explore the three stages of indoor seed starting in detail, along with some common challenges and solutions to help you succeed.
Stage 1: Germination – The Beginning of Life
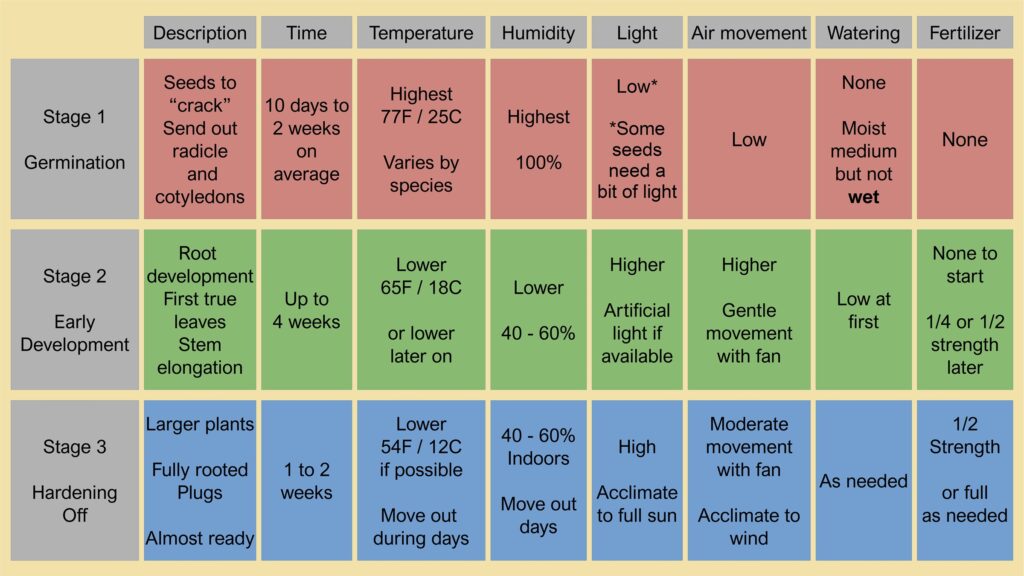
Germination is the first stage of growth, where seeds crack open to release a tiny root (radicle) and their initial leaves (cotyledons). These conditions are vital to ensuring success:
- Temperature and Humidity: High temperatures (around 77°F or 25°C) and high humidity create the ideal environment for germination. Use a heating mat or a warm indoor space, and maintain humidity by doming or tenting the trays with plastic covers.
- Light: Seeds generally don’t require light at this stage. Their energy comes from stored nutrients within the seed itself.
- Moisture Management: Soil should be moist but not soggy. Overwatering can lead to rot, so it’s better to err on the side of caution.
- Timeframe: Most seeds germinate within 10 days to two weeks, but this depends on the seed type and temperature.
By providing these optimal conditions, your seeds will germinate efficiently, setting the stage for robust development.

Stage 2: Early Development – Strengthening Seedlings
Once the first true leaves appear, it’s time to transition seedlings to the early development stage. This phase focuses on strengthening their structure and preparing them for the outdoors.
- Temperature and Humidity: Drop the temperature to around 65°F (18°C) to slow growth and prevent leggy, weak stems. Lower the humidity and increase air circulation to encourage sturdy stems.
- Light: Bright light is critical during this stage. Position seedlings on a sunny windowsill or under grow lights for 12-16 hours daily to prevent stretching.
- Watering: Seedlings require infrequent but careful watering. The goal is to keep the soil slightly moist without over-saturating.
- Fertilizer: Initially, seedlings rely on stored nutrients, but as they grow, introduce a diluted liquid fertilizer at quarter or half strength to support root and leaf development.
This stage typically lasts about four weeks, during which the seedlings mature into compact, healthy plants.
Stage 3: Hardening Off – Preparing for the Outdoors
Hardening off is the critical final stage before seedlings can be transplanted into the garden. Gradually acclimating plants to outdoor conditions minimizes transplant shock and helps them thrive.
- Temperature and Exposure: Gradually lower the indoor temperature to around 54°F (12°C) at night. During the day, expose seedlings to outdoor conditions for increasing lengths of time.
- Sunlight and Wind: Begin with shaded outdoor locations, gradually moving seedlings to full sun over one to two weeks. The exposure to natural wind strengthens stems.
- Watering and Fertilizing: Transition to a regular watering schedule based on soil dryness, and continue feeding with a diluted fertilizer.
Once hardened off, your seedlings are ready to be planted in the garden or potted for further growth.
Troubleshooting Common Seed-Starting Issues
Even with careful planning, some challenges may arise. Here are solutions to a few common problems:
- Leggy Seedlings: Caused by low light or high temperatures. Move seedlings closer to a light source and reduce indoor heat.
- Damping Off: A fungal issue that causes seedlings to collapse at the soil line. Avoid overwatering, ensure good airflow, and use sterilized seed-starting mix.
- Yellowing Leaves: Often a sign of nutrient deficiency. Introduce a diluted liquid fertilizer to address the issue.
- Slow Germination: Check soil moisture and temperature. Some seeds may require pre-treatment, such as soaking or stratification, for better germination rates.
Addressing these problems promptly will help keep your seedlings healthy and on track.
The Final Transition: Moving to the Garden
After completing the hardening-off stage, your seedlings are ready for their permanent homes. Whether transplanted into the garden or larger pots, they will now benefit from the care and preparation you’ve provided.
Jason emphasizes the importance of these three stages as the foundation for a successful growing season. By adjusting temperature, humidity, light, and other environmental factors at each stage, you give your plants the best chance to thrive.


